Thursday 29 November 2012

DIY - "Felt" in Love with Christmas Wreath

Early this month I blogged about how I "Felt" in Love with felt!
Here is one of the project I did yesterday - Christmas Decorative Wreath!

Materials:
Felt: dark green, light green, red (or pink!)
x 1 embroidery hoop - size is up to you - I used an 8" diameter 
x 15 pinboard pins (those with a ball shape top)
Glue gun (can't live without it!)
A pair of scissors


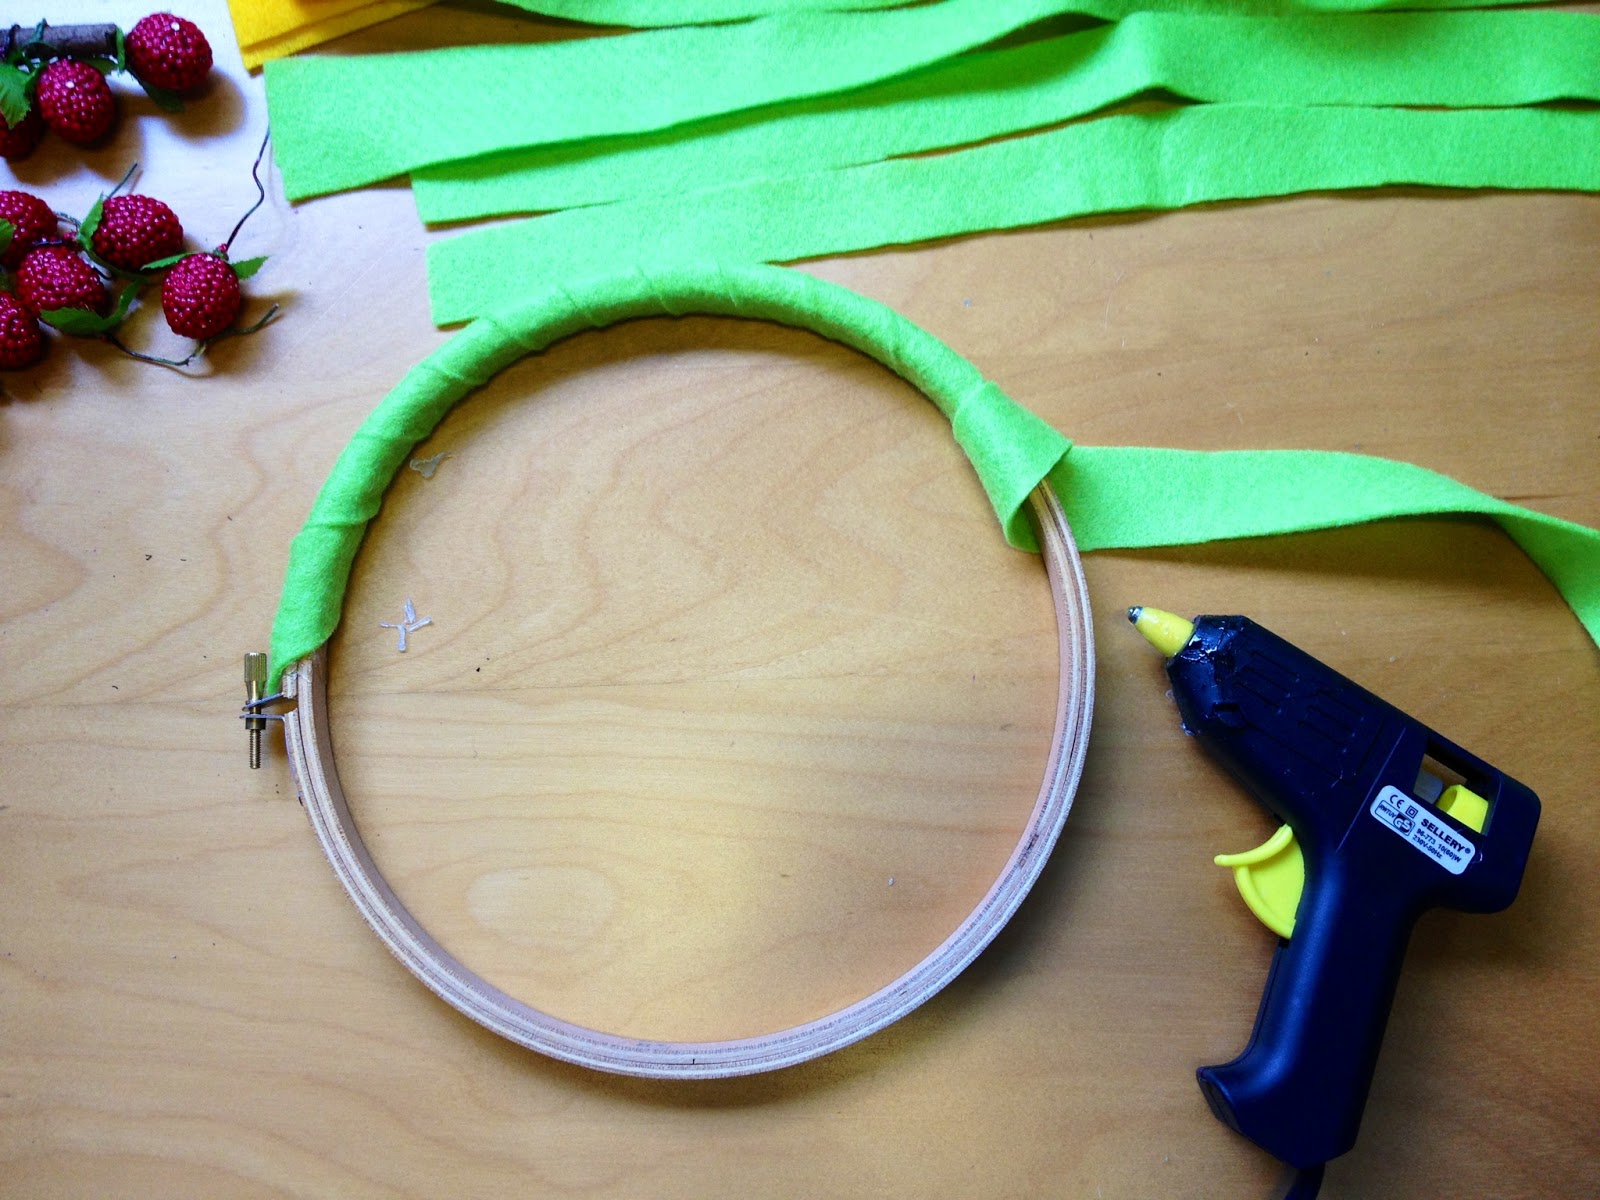
Cut out the felt in stripes - approximately 2.5 cm x 50 cm
You will need around 4-5 stripes depends on the size of your embroidery hoop.
I choose a bright light green felt, so that the colour will reveal for the area that is not covered by the leaves (which you will glue next) to create a colour contrast.


Use the hot glue gun and put the glue on the OUTSIDE and INSIDE of the embroidery hoops (the sides do not require) then attach the felt stripe around it

Tips: Don't try to put the glue around the whole hoop, do it bit by bit as the glue dries out quickly!


Cut out the felt (darker green) in leave shape, visually it will look nicer if the leaves are small, slim and elongated, however the smaller the leaves, the longer it requires to cover the whole embroidery hoop! 


I put a little bit of glue on the tip of each leave and glue it immediately onto the wreath. 

Tips: Don't put glue onto the felt stripe because you want to get it done quickly! You don't want the glue to be seen!


About 30 minutes later, you have the whole wreath covered with leaves. 
(You probably are amazed by your patience! I did!)


Once you completed covering the wreath with leaves, put it aside.
(Have a coffee break! You are half way there!)

The next step will be cutting out the felt for the flower petals.
Choose a colour felt that creates a good contrast with the leaves. 
This time, you can cut them slightly bigger than the leaves (you need about 70 pieces) again keep it slim and long.

Cut a round circle from the dark green felt (i.e. the same colour felt you used for the leaves) which will act as the "base"

Glue the flower petals onto the "base", all the pointy bits touching the middle. 
Dont worry if they do not overlap well.

Repeat the same steps and make five lovely Christmas flowers.


Put some glue on the back of the "base" and glue the flowers onto the wreath.
Then use the ball shape pins to poke through the center of each flower, where the pointy bits meet. 


Attach a string onto the top of the embroidery hoop (there is a gold metal bit where you can attach with)


Tah - Dahhhhh! You have it! Hope you enjoy this tutorial!
Merry Christmas everyone!!!


I used it to decorate my sales corner at the lovely cafe Orange Thimble 


Sunday 25 November 2012

"Fly with Us" Bespoke Wedding Invitation Design Hong Kong

Kimmy and Karho wanted to reflect a whimsical feel and a sense of freedom on their wedding invitations. They are fond of my illustrations and asked me to illustrate hot air balloon and wheel ferris. This playful Invitation design comes in English and Chinese, all beautifully letterpressed on thick cardstock. 
Calligraphy by Kalo Make Art


some initial ideas for the wedding invitation design


Final Letterpress pieces!


Saturday 24 November 2012

Miniature Christmas Bonsai Tree

A special someone is not at home to celebrate Christmas with you this year?
You want to send him / her something really sweet and memorable and yet not too bulky. Something that is small enough to be able to carry around but thoughtful enough to show that you really miss him / her!

What about a Miniature Christmas Bonsai tree?
Don't worry, this is not a real tree (so it is postal custom approve!) it is a miniature tree I put together carefully by gluing green bushes onto plastic tree branches (like the model architects use!). The tree is then glued onto a terracotta base, finished by adding a twine bow on the branch. 

This sweet and cute Miniature Christmas Bonsai Tree will come packed in a small gift box, with tissue paper underneath. Once the lid is on, it will be wrapped with a red/white twine. (as seen in 2nd and 5th picture)

To see more details, visit my Etsy Shop


Here are some pictures of my friends receiving my mini Bonsai trees :)


Visit Kalo Make Art Etsy Shop - Christmas Cards


Still haven't bought your Christmas Cards?
Check out Kalo Make Art's Etsy Shop!

All my Christmas cards are hand-drawn illustrations - fun, sweet and quirky. 
Will definitely bring a smile to your face.


Hurry up! Visit my Etsy Shop and get some for your special someone(s)!

Sunday 18 November 2012

"Rustic Basque Country" Bespoke Wedding Invitation Hong Kong

Melinda, from Shanghai and Iker from France are having their wedding at a beautiful countryside of Basque country, in the Southern France. With such an amazing and stunning wedding setting, they are keen to make every single detail perfect and spotless. From the rustic hot air balloon illustration invitation,  carefully hand-drawn vintage style map to the petite information guide booklet filled with light-hearted illustrations, I have injected a rustic yet contemporary feel to their wedding suite. Stationery was printed on high quality paper as the final touch and finish.


Original line drawings of the hotels which will then be placed onto the map


The view of Machoenia, the actual wedding venue


 Original drawing of Machoenia, the actual wedding venue


Sunday 11 November 2012

"Bubbles & Champagnes" Bespoke Wedding Invitation Design Hong Kong

Eva and Ricky are big fans of champagnes and sparkles, all their friends know it! They are so passionate about drinking champagnes, she and Ricky even made it as their wedding theme! A soft pastel colour palette was used throughout the invitation suite, invitations, RSVP, Menu are all covered with bubbles while the Information Card was die cut into a champagne bottle shape.


You may also like ...